
Essential Tips for Using a Caulking Tool in Melbourne Homes
If you’ve ever dealt with cracked, mouldy, or peeling sealant around your bathroom or kitchen, you know how quickly it can make a home look run-down. Most Melbourne homeowners struggle to get a clean, professional finish when using a caulking tool for the very first time — and it’s far more common than you’d think. The good news is that with the right technique and a few practical tips, you can tackle this job like a seasoned tradie without breaking the bank.
Whether you’re sealing a shower recess, fixing draughty window gaps, or freshening up a laundry splashback, having a reliable caulking tool makes all the difference to the final result. In this guide, we’ll walk you through everything from choosing the right tool to applying a flawless bead every single time. By the end, you’ll have the confidence to handle any caulking job around your Melbourne home with ease.
Understanding Different Types of Caulking Tools
Caulking tools come in a wide range of types, from basic manual guns to battery-powered options. Knowing which one suits your specific project helps you work faster, cleaner, and with far less frustration on the job.
The most common type used in Australian homes is the standard squeeze-gun caulking tool, which gives you solid control over flow and pressure throughout the application. Battery-powered versions are a great option for larger projects where hand fatigue quickly becomes an issue after extended use. Foam-grip handles and smooth-rod mechanisms help produce a consistent bead with minimal mess and dripping. Understanding your options before heading to the shops saves you both time and money in the long run.
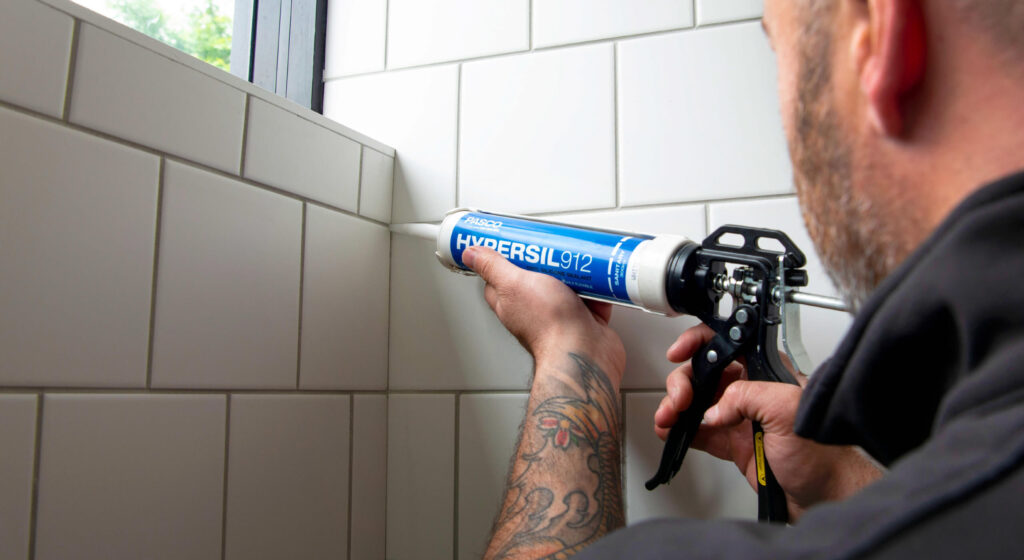
What is a Silicone Caulking Tool and When to Use It
A silicone caulking tool is designed specifically for applying and smoothing silicone-based sealants. It’s the go-to choice for wet areas like bathrooms, showers, and kitchens where water resistance is absolutely essential.
Silicone sealant is far more flexible and waterproof than acrylic, making it the preferred choice for high-moisture zones in your home. A dedicated silicone caulking tool ensures the product flows smoothly and evenly without air bubbles or frustrating gaps in the bead. These tools often include a built-in nozzle trimmer and puncture rod for added convenience during the job. If you’re working on bathroom caulking Melbourne projects, silicone is almost always the right material to reach for.
Choosing the Right Caulk Removal Tool for Your Project
A caulk remove tool helps strip away old, damaged sealant cleanly without scratching your tiles or delicate surfaces. Choosing the right one depends on the material, age, and exact location of the existing caulk.
Old sealant that’s cracked, discoloured, or full of mould needs to come off completely before you apply any fresh product underneath. A quality caulk removal tool typically features a stiff blade on one end and a flat scraper on the other for versatility. For silicone sealant, a plastic scraper is ideal to avoid surface damage — especially on acrylic baths and shower bases. Pairing a solid caulk removal tool with a caulk-softening spray makes the whole job far less tedious and time-consuming.
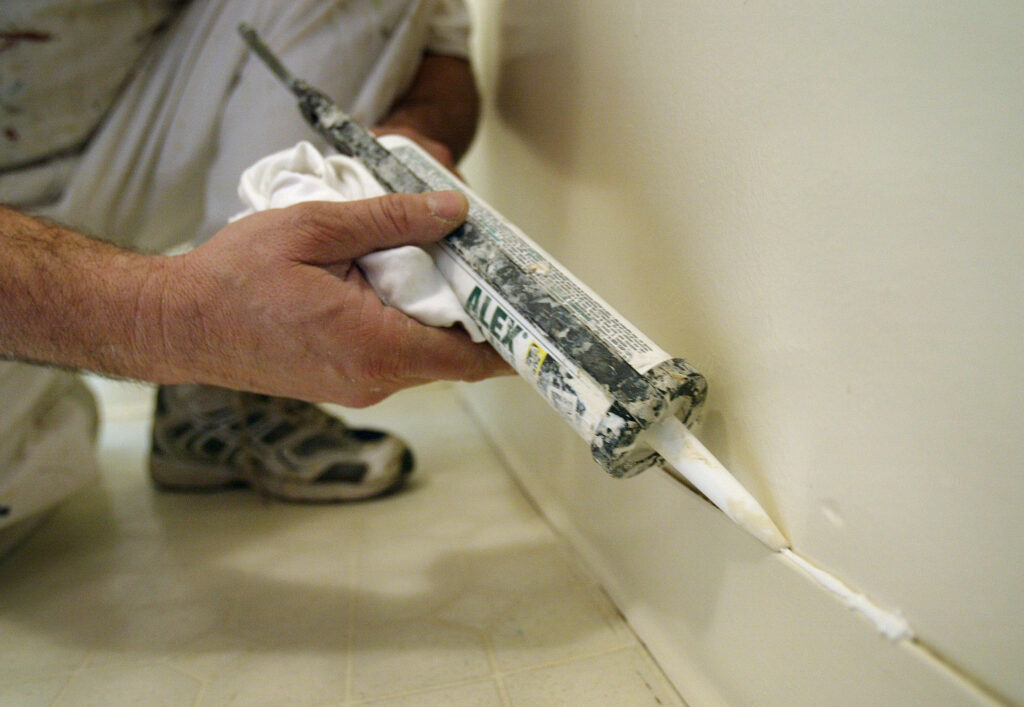
Step-by-Step Instructions: How to Use a Caulking Tool

Learning how to use a caulking tool correctly takes a little practice but makes a massive difference to the finished result. Follow these straightforward steps to get a clean, professional-looking bead every single time.
Getting the basics right when learning how to use a caulking tool will save you time, wasted product, and plenty of frustration on the job. Always cut your nozzle at a 45-degree angle to control bead size and keep the flow moving in the right direction. Hold the gun at a consistent angle and move at a steady pace — this avoids the common problem of thin spots or blobby buildup along the joint. Practise on a piece of scrap cardboard before you tackle the real thing — it works an absolute treat.
Step-by-step process:
- Remove all old sealant with your caulk removal tool
- Clean and dry the surface thoroughly with isopropyl alcohol
- Apply painter’s tape on both sides of the joint
- Cut the nozzle at 45 degrees and pierce the inner seal
- Load the tube into the gun and squeeze the trigger gently
- Apply steady, even pressure while moving at a consistent pace
- Smooth the bead with a damp finger or finishing tool
- Remove tape immediately while the sealant is still wet
Preparing Your Surfaces for a Smooth Finish
Clean, dry, and grease-free surfaces are absolutely essential before applying any sealant. Skipping surface prep is one of the most common reasons caulk peels or fails prematurely in Melbourne homes.
Start by removing all old sealant using your caulk removal tool, then wipe the area down with isopropyl alcohol to remove any soap scum or grease. Make sure the surface is completely dry — even a tiny amount of moisture can prevent the sealant from bonding properly to the substrate. Apply painter’s tape on both sides of the joint for a crisp, straight line that looks professionally done. Proper surface prep is genuinely the difference between a tidy finish and a messy patch-up you’ll redo in six months.
Applying Silicone Caulk Without a Tool: Expert Tips
Knowing how to apply silicone caulk without a tool is handy when you’re caught in a pinch. Use a damp finger or a spoon to smooth the bead, and always work quickly before the silicone skins over.
There are situations where understanding how to apply silicone caulk without a tool comes in very handy — like doing a quick top-up repair on short notice between professional visits. Squeeze the tube directly into the joint and use a damp finger dipped in soapy water to smooth the bead evenly as you go. Work in short sections of around 30 centimetres at a time to maintain a wet edge and avoid dragging dried product across fresh sealant. It’s not the most precise method in the world, but it absolutely gets the job done in a pinch.
Common Mistakes to Avoid When Using Caulking Tools
Even experienced DIYers make avoidable mistakes with caulking tools. Knowing what to watch out for helps you get a neater, longer-lasting result without the headache of redoing your hard work.
One of the biggest mistakes people make with their caulking tool is cutting the nozzle far too wide, which makes controlling the bead nearly impossible from the outset. Rushing through the job or skipping surface prep entirely leads to adhesion failures that show up within weeks or months. Using the wrong type of sealant — like an acrylic product in a constantly wet area — means you’ll be pulling the whole thing out and redoing it well before you planned. Slow down, follow the steps methodically, and your results will absolutely speak for themselves.
Overfilling Joints or Uneven Application
Overfilling joints creates a messy finish and wastes sealant unnecessarily. Keeping a steady hand and consistent pressure on your caulking tool ensures a clean, uniform bead from one end of the joint to the other.
Applying too much product in one go is a classic beginner mistake — less is genuinely more when it comes to caulking. Keep your movement smooth and steady, releasing pressure on the trigger just before you stop to prevent unwanted drips or blobs forming at the end. If you do overfill a section, smooth it quickly with a wet finger before it starts to cure and becomes difficult to work with. The goal is a slightly concave, even bead that sits flush with both surfaces on either side of the joint.
Not Cleaning Tools Properly After Use
Failing to clean your caulking tool after each use leads to dried product blocking the mechanism over time. A quick clean-up after every single job keeps your tools working smoothly for years to come.
Silicone and acrylic sealants start to skin over within minutes of application, so clean your tool as soon as you’ve finished the job. Pull the remaining sealant tube out of the gun and cap it tightly to prevent the product from drying out in the nozzle between uses. Wipe down the rod, frame, and surrounding areas with a rag dampened with acetone to shift any silicone residue before it hardens completely. A well-maintained caulking tool will genuinely last for hundreds of jobs if you look after it properly after every use.
Finding the Best Caulking Tools Near Me in Melbourne

Searching for caulking tools near me in Melbourne? You’ll find a solid range at local hardware stores, trade suppliers, and online retailers who offer next-day delivery options right across the city.
If you’re hunting for caulking tools near me options around Melbourne, stores like Bunnings, Total Tools, and Beaumont Tiles all carry a reliable range of guns, smoothers, and removal tools. Trade suppliers often stock professional-grade options that simply aren’t available at your standard big-box retailer, and staff there can give you real advice. Shopping online through retailers like Amazon AU or trade websites gives you access to a wider product range with competitive pricing and honest customer reviews. Read specifications carefully and compare models before committing — especially when it comes to battery-powered options.
Local Stores and Online Options for DIY Homeowners
Melbourne DIYers have excellent access to quality caulking tools through local hardware stores and reputable online suppliers. Both options offer solid value depending on your budget, project size, and personal preference.
Local hardware stores let you hold the tool in your hand before buying, which genuinely matters when assessing grip comfort and build quality side by side. Staff at trade stores can also offer solid advice on which product suits your specific caulking in Melbourne project — whether it’s a beachside bathroom or an older terrace home. Online shopping makes it easy to compare brands, read real customer reviews, and often find better deals than you’d find in-store on any given day. Either way, always prioritise a smooth-rod mechanism and a comfortable grip for the best results.
Comparing Tool Quality and Prices
Entry-level caulking tools start from as little as $10, while professional-grade guns can run upwards of $80. A mid-range option around $30–$50 gives most Melbourne homeowners the best balance of quality, durability, and value.
Cheap tools often have poor pressure control and flimsy frames that buckle under regular heavy use — they’re simply not worth the saving. A mid-range caulking tool typically features a dripless mechanism, which stops sealant oozing when you release the trigger — a genuine game changer for achieving clean, tidy work. For caulking in Melbourne’s humid bathrooms or coastal-adjacent properties, a corrosion-resistant frame is well worth paying a little extra for upfront. Don’t buy the cheapest option if you plan to use the tool regularly — it will end up costing you far more in the long run.
DIY vs Professional Caulking Services in Melbourne
DIY caulking works well for minor touch-ups and routine maintenance, but complex or large-scale jobs are often better left to professional Melbourne caulking services for a guaranteed, long-lasting, and polished finish.
Many Melbourne homeowners tackle caulking themselves with excellent results — especially once they’ve got a real handle on how to use a caulking tool with confidence and precision. However, for large bathroom renovations, heritage homes with tricky or irregular surfaces, or commercial properties, caulking services Melbourne professionals bring both genuine expertise and access to premium-grade products. A professional job typically includes full removal of all old sealant, thorough surface prep, and a clean finish backed by a solid workmanship guarantee. For most homeowners, the DIY route is perfectly fine for ongoing maintenance, but professionals are worth every single cent for bigger or more complex projects.
When to Hire Melbourne Caulking Services for Bathroom Projects
Hire bathroom caulking Melbourne specialists when dealing with mould behind tiles, large shower recesses, or surfaces that have repeatedly failed. Professional intervention prevents costly and disruptive water damage down the track.
Bathroom caulking Melbourne professionals deal with tricky situations on a daily basis — leaking shower bases, tile movement from settling foundations, and deep mould issues that go well beyond the visible surface. If your sealant keeps failing despite repeated DIY attempts, there’s very likely an underlying structural issue that needs a professional assessment and solution. Melbourne caulking services use commercial-grade sealants and application techniques that consistently outperform anything available off the shelf at your local hardware store. Don’t wait for water damage to appear in the ceiling below — call in the experts sooner rather than later to save yourself a much bigger bill.
Benefits of Regular Caulking Maintenance for Your Home
Regular caulking maintenance protects your Melbourne home from water ingress, mould growth, and structural damage. It’s a small, affordable investment that saves homeowners thousands in avoidable repairs over time.
Key benefits of staying on top of caulking maintenance:
- Prevents water damage to walls, floors, and cabinetry behind wet areas
- Significantly reduces mould and mildew growth in bathrooms and kitchens
- Keeps bathrooms, kitchens, and laundries looking fresh and well-maintained
- Extends the working life of tiles, grout, and fixtures throughout the home
- Helps maintain your property’s market value ahead of any future resale
Most experts recommend inspecting and touching up caulking every 12 to 18 months, particularly in high-use bathroom and kitchen areas. Catching a small crack or gap early is far cheaper than dealing with rotting wall substrates or mouldy internal cavities later down the track. Melbourne’s humid summers and cool winters cause natural expansion and contraction in sealant joints, which accelerates wear over time. A good caulking tool and a quality tube of sealant are genuinely all you need for a solid annual home maintenance routine.
FAQ:
Q1: How do I know when it’s time to replace my caulking?
If your caulk is cracking, lifting, discoloured, or showing stubborn mould that won’t clean off, it’s time to reach for a caulk removal tool and start fresh.
Q2: What’s the best silicone caulking tool for a beginner in Australia?
A mid-range dripless silicone caulking tool with a smooth-rod mechanism is ideal for beginners — it gives you excellent control without the mess.
Q3: How long does professional bathroom caulking in Melbourne typically last?
Quality bathroom caulking Melbourne jobs generally last between five and ten years when applied by professionals using commercial-grade silicone sealant.
Q4: Can I apply silicone caulk without a tool for a small repair?
Yes — knowing how to apply silicone caulk without a tool works fine for minor touch-ups; squeeze the tube straight into the gap and smooth it over with a wet finger.
Q5: How much do Melbourne caulking services typically charge for a bathroom?
Caulking services Melbourne tradies usually quote somewhere between $150 and $400 for a standard bathroom, depending on the size and how badly the old sealant has deteriorated.
Conclusion
Now that you know how to use a caulking tool properly, you’re ready to keep your home sealed and looking sharp without calling someone out for every little job. From picking the right caulk removal tool to knowing when it genuinely makes sense to bring in professional Melbourne caulking services, you’ve got everything covered. Staying on top of it with a decent caulking tool once a year is honestly one of the easiest ways to avoid expensive water damage and mould headaches down the track. Ready to give your bathroom or kitchen the refresh it actually needs?
👉 [Get Your Caulking Quote with Black Diamond Caulking Today]